Friday, December 23, 2011

Merry Christmas ..Happy Snowman

Stopping by to wish everyone a very Merry Christmas.
All you need a little patience and lot of love to make these cute snowmen, that's my mantra for the new year. Hope to get some more crafts ideas and fun ideas in my blog the coming year.


Supplies:
Toilet paper roll (for support)
Circle cut out in white 2 pcs (head -body)
Ribbon
Google eyes
Buttons(color pens work just as well)
Glue
Black paper cut out for hats
Decoration for the hat (we used star form stickers)
Color pen (red: we are going festive)

Once you have the supplies, your little one can basically stick everything together.
I helped him and his friends with the glue stick a bit specially with the ribbons but older kids can do just fine without much assistance.

Happy Holidays:)


Wednesday, December 21, 2011

Cottons Round Snowman


Aaravs best friend Anoushka just loves to do craft or as she calls it activity time. Thats just the kind of push you need some days to think of a quick craft idea.we made these super cute Christmas cards for the dads.

Supplies:
Construction paper (your choice)
Google eyes
Red paper for hats and nose
Buttons
Color pens for making the snowman smile and for making shoes and arms
                                                                                    Glue


 I just let the kids know how the snowman will look once put together and they asked for help with the mouth and hands. The idea was to use twigs for the arms, but it was too cold to go outside, call us lazy we just used color pens instead and added shoes too.

Merry Christmas and Happy New Year, make something new :)


Thursday, December 1, 2011

Foot Print Turkey

 Thanksgiving is long gone, we finally got around doing something similar to all the beautiful Turkey and thanksgiving crafts online. My son loves his glue stick so paper crafts always gets him interested. I used green craft paper to trace his foot print and cut some feather like patterns in orange and yellow, our favorite fall colors.


Supplies:


Craft paper foot print cutout
Scissors
Google eyes
Small cutout for nose and mouth
Glue


I explained first how the different peaces will come together to make the Turkey( which amused him and led to questions like why is the Turkey green ) Like I said he loves his Glue stick and soon got busy with the activity. We spoke some more about what Turkey eat and habitat for small farm animals.


Tips:
More then anything else, all crafts or activities have to be simple and age appropriate.  I like to get everything ready pre-cut before we start including books you want to read. We also talked about thanksgiving and other festivals around the world.


Tuesday, November 8, 2011

Hallooween Fun


 This is our first attempt at pumpkin carving, as my son got so excited with all the fun fall activities he was going int he school. He wanted a scary pumpkin with spiders. So while he got busy with the Halloween form stickers to make a small decoration frame for the door. Mom got ready to crave small slits to put the scary eyes we picked up from the dollar store. used more foam sticker the nose and pipe cleaners for the mouth. We used a fruit basket and added fake grass from Easter to place the pumpkin. Then we added some more stickers to the pumpkin, check out the spider sticker for eyebrows, now that's imagination for 3 year old.

More Spider and fake rings to add more spooky Halloween fun.


Happy Halloween.

Wednesday, November 2, 2011

Fall Wreath

My son came home with this unfinished wreath. It's such a nice and simple way to add color to our door. We both went out side for a quick walk around the neighborhood and  picked up these twigs, leaves and wild berries.

Supplies:
Orange paper-plate
Orange pipe cleaner
Glue
Twigs, leaves and wild berries (for decoration)

On the Paper plate, spread glue and add the twigs, leaves or any other decoration. Make a small hole and add pipe cleaner to make a hanger for the wreath. Nice, easy and warms up the doorway.


Tuesday, October 18, 2011

Cardboard box Alien

Supplies:
Paper box covered in white paper
Orange color paper (cut out small eyes, nose and silly smile)
Glue
Pipe cleaners

I recycled small paper cartoon (snackbox) you can use any
Covered it with white paper ( to give the ghostly look)
Stick the eyes, nose and smile
Finally add pipe cleaners at top and curl them
Aarav calls then silly hair

Super easy and cute, we used these to play puppets and tell silly stories.

Tuesday, September 27, 2011

Alphabet Mat

I'm a little behind in posting my craft project, blame it on the lazy summer days of Chicago. This activity is a fun tool for keeping little bodies busy and brush up on ABC's.        
                                                                       
 Supplies: 
Bottle caps 26 counts
Labels
marker
Form or cardboard  sheet.

Add labels to bottle caps and write your ABC's .
On the Form or cardboard sheet make a table and jumble the Alphabet.
Your Alphabet Mat is ready

Tips: 
Older kids can helps younger kids in all the steps.
Feel free to decorate your mat.
You can also use colorful labels or stickers

I mixed up the Alphabet order as my little one is old enough to figure it out. The next step will be to use  animals or fruits and vegetable to go on the mat, we have been practicing that too, works like a charm.


Toilet paper roll trees

Its been ages since I last updated my blog, call me lazy...lol. Thought of posting a few simple ideas to keep kids busy which they can handle by themselves or with little help

This one is called paper roll tree  and as you will see in the pictures, its very simple and still guaranteed to charm the kids.

Supplies:

Toilet paper roll (preferably brown ones)
green craft paper (for tree cut outs)
color pens/crayons
sticker (optional)
scissors/glue

How to and tips:
Clean your Toiler paper roll of any left over tissues.
Cut green craft paper into a tree like or cloud like cutout.
Use scissors to make two small slits on paper roll sides for the cutout to fix in.
Decorate the green with color pens /crayons or stickers, I used a frog stickers, you can use other tree animals like monkeys or just ask your kids to make their own. Depends mostly on the age of the kids, I'm working with 3 year old, they just love the coloring part.

Our kids love making branches, leaves, nest and birds, we also sang our favorite  barney song 'There was a hole'http://www.youtube.com/watch?v=mINPh9-eTss&feature=related

Enjoy


playing with colors

Some days I just let my little one play with colors be it a empty box , a paper bowl , it sure keeps him occupied and you never know what will be the end product.

Wednesday, June 22, 2011

papercups/bowl jellyfish

I was thinking what to do with the leftover paper bowls ..when my son decided to pain them. This simple project is so easy and we were done in a jiffy of course thats after he was done painting and repainting the bowls.

supplies:
Paper bowls or cups
paint and brush
glue
party streamer or ribbons

Paint the paper bowls or cups as u like them, preferably pastel colors

Once its dry, add glue to the insides of the bowls/cups

Add streamer or colorful ribbons, both would work great


Tips:
An adult can cut the streamers in thin strips for the kids or let them try it themselves  with a kid safe scissors.
Its a raining day craft, but can work for playdates or birthday parties too
Talk to the kids about Jelly fish or other  sea creatures.
Let the kids explore with colors , my son loves to mix them ..its amazing how much toddlers love to paint.

Saturday, April 9, 2011

Toilet paper roll Bunny

Just another play-date with Aarav's friends turned into a cute Easter Bunny. The kids wanted to do some crafts (Aarav just wanted to use some Glue).

Supplies:
Toilet paper roll
googly eyes
blackpen
white/pink craft paper
Glue

Cover toilet paper roll with white paper.
Cut a small sheet of white paper shaped as Bunny Ears
Use a smaller sheet of pink paper, shaped as inner Bunny Ears, Nose and Tummy( see picture above )
Attach the Ears, Nose and Tummy to the paper roll.
Stick Googly eyes.
Use black pen to add whiskers and mouth.

Tips:
Ask the kids to paint the toilet paper roll (pink/yellow r good options)
Great idea to have a simple bunny story or talk about other animals on the Farm


Tuesday, March 29, 2011

recycle the recycle..upcycle

We have a busy household with a active 3yr old, keeping him occupied and busy while I get some work done takes some planning. I'm forever collecting bottle caps, egg cartoons,cans and packing material for future use.  So for this project a covered a few big boxed with white paper and let my son use his imagination.

Supplies:
Egg cartoons
Bottle caps and bottles
Soda cans
Kitchen towel rolls
Glue
Finger paint
Tape
Cereal box or any other kind of packing material
Use anything you have at home (thats the whole idea)

I covered a few big boxes with white paper and helped my son(Aarav) tape a  few pieces together. What started as a car quickly turned into a robot, with a little imagination and lot of glue Aarav was ready to color his robot. Soon the robot had a name..Mr.Memorybot. Aarav took his time to color it with his fingers and paint brush.


It was hours of fun, you can never go wrong with glue, color and boxes(give it a try)

Tips:
Start a conversation of what you are trying to make, before you start joining the pieces, get the kid(s) excited.
Go with the flow, let them use their imagination
Make it fun, add color or sparkles like their favorite color.


Monday, March 21, 2011

Tips for first play date

Some easy tips for planning your first play date:
  • Talk to your child about calling his friends over, specially about sharing his toys
  • Its Ok to hide a few of his favorite toys if he is not comfortable sharing them all with friends
  • Plan in advance how long will the date last, activity or theme arrangements
  • If the kids will be dropped off or will the parents stay with the kids 
  • Some kid friendly snacks like popcorn's, cookies, juice etc.  also for the moms some snacks like coffee and sandwiches.
  • If its your first time hosting a play date keep it simple and make the house rules clear to the kids. 
  • Its a good idea to have kids of same age group so they can enjoy the play-date together
  • If possible inform the parents in advance about the play-date  theme or what activities you have planned for the kids.
  • Be ready to play with the kids even when sitting and chatting with the moms seems like a good idea. kids love the interaction.
  • While babies love to play side by side, toddlers love simple crafts, keep some time aside for singing and going silly.
  • Kids will fight or cry, be ready to play referee
  • Invite  the group to another play-date, or you can rotate houses.

Thursday, March 10, 2011

Irish Bat (Egg carton Bat)

This St.Patty week I saw a little too much of green. I had seen these egg carton bats at Halloween and decided to make a this green inspired bat. Its simple and a great craft project on a budget.

Supplies:
Egg carton (cardboard)
green paint (fingerpaint or any other kind)
google eyes
green pipecleaner
glue and scissor


Cut the egg carton into four parts each with 3 egg cartons as we made four bats.

For each bat cut the side shells to make it look like bat wings( keep them little pointy) repeat on the back side too.

Paint the egg carton green , by son loved to use finger paint and get messy, when its dry add google eyes or use black markers to make eyes.

Use scissors to make hole on the middle section joining the egg cartons, insert the green pipecleaners and join the pipes by twisting the ends, makes it easy to hang around the house.

Tips:
If green is not your color paint the bats black, you can also go creative with color.
Its a good time to talk to your kids about bats and share some interesting facts like they hang upside down or they come out in the night, what kids of food they eat.


Friday, February 25, 2011

Rainstick/ Paper Towel Rice Maracas


My son just loves music, we made these rice Maracas with paper towel tube. He loves going crazy with it, we call its making sweet music.

Supplies:
Paper towel tube (any other long paper tube)
Glue/Scissors/Duct tape
White paper sheet (color paper also works )
Brown paper to make caps or use juice bottle caps
Rice (other lentils or beans)
Crayons, markers and stickers to decorate

Trace the ends of the paper towel on a the brown paper or construction paper , make a bigger circle and cut to fit (cap) the paper towel ends. Cut and keep another cap for the other end. We used us juice bottle caps as they were perfect fit for the paper towels. Use glue to fix the cap, keep the other end open at this point.

Add rice and other dry lentils or beans into the tube. Fill it only 1/10 full for more effective sound.

Cover the paper towel tube with white paper sheet or color paper. Use the other paper cap or juice bottle cap to secure the rice inside.  Make sure you have the side nicely secured or you will have a big mess to clean.

Decorate the tube with Crayon, markers or stickers.

Tips:
Make more than one rainstick  one for each hand.
Teach kids simple rhythms or let the kids make their own music
Incorporate other music instruments(guitar, drums, flute) for your very own concert, truly special-enjoy


Thursday, February 24, 2011

Egg Carton Caterpillar


Recycling at its best, and kids love this easy craft project. As always I made use of the things at home.

You can always get creative.

Supplies:
Egg cartoon -cardboard type not Styrofoam type
Scissors
Color green, yellow, red (kids can use washable paint too) 
Marker-Black or use wiggle eyes(googly eyes)
Glue
Ribbon or pipe cleaner

Start by cutting 6 cups from the egg cartoon , best if done by a adult be careful not to cut too close to the cups just trim them so they retain shape.

Color the outer-sides of the cartoon with washable paint or crayons, let the kids have fun and personalize their very own caterpillar. Anything from fullon green  to polka points, let the colors try.


Choose which ends should be the caterpillars head and make two holes close to the top section of the cartoon. I used pens, you can use knife or scissors. 

Cut the pipe cleaners or ribbons  to approx 5" long. Insert from the inner-sides of the caterpillar into the holes, pull the ribbons or pipe cleaners to same length antennae. If pipe cleaners are use to can curl the ends.

Glue eyes onto the caterpillar and make mouth with the marker, if wiggle eyes are not available make eyes with marker pens too. Your caterpillars are ready


Tips:
Straws are a great substitute too if ribbons or pipe cleaners are not available .
If a good idea to talk about different caterpillars to give kids some idea. Good idea also talk about thinge like what do they eat and where they live.


Helloo Mr. Sun

Oh Mr. Sun. Sun. Mr. golden sun. Please shine down on me.
Oh Mr. Sun. Sun. Mr. golden sun. Hiding behind a tree.
These little children are asking you. To please come out so we can play with you.
Oh Mr. Sun. Sun. Mr. golden sun. Please shine down on me.

Mr.Sun is my Son's Favorite Barney song. On this cold gloomy day we are missing the sunshine, so we decided to make our very own Mr. Sun. Its simple and has all things that makes kids happy.

Supplies:
Cardboard
Plain white paper
Crayons(yellow, red, orange)
Wiggle eyes
Color paper or foam paper (red/orange)
Glue
Scissors

Take a small cardboard  piece and stick the plain paper. Make a  sun shaped cut out, can be done by preschoolers themselves or by adults.

Color the sun  with bright colors, let the kids use their imagination. Attach wiggle eyes and cut color paper or form paper to make mouth.

Mr. Sun is ready, we place him on our window.

Tips:
Use black or color pens to make eyes and mouth if these supplies are not handy.
My son sings to the sun and we talk about the weather almost everyday. Its a simple way to teach kids about the  weather outside.


Friday, February 11, 2011

Tree of Hearts ( Valentine Tree)

This craft Idea is a twist really to the ever popular Valentine Tree. Keeping in mind the fast approaching Valentine's day we made this simple Valentine's Tree. Its a perfect craft project for little preschoolers who love hearts, crayons and Cheerios.

Supplies:
Cardboard
Crayons-green
Glue
Craft paper-preferably red/pink/white
Scissors
Some Cheerios

Cut the cardboard shaped as a tree and craft paper into different size hearts . Make all the cut outs before you sit with the kids specially if they are too young to use the scissors themselves.

Ask the kids to color the cardboard tree green, use crayons or paint.

Keep all the different hearts in a bowl and let the kids stick the hearts onto the tree.

Tips:
You can also use small form hearts and glitters.
Mostly let the kids have fun its Valentine's Day -spread the love and enjoy the moment with your kids


Tuesday, January 25, 2011

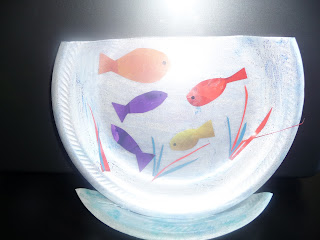
Paper Plate Fish Bowl

This one is a fun Craft project we did over the weekend and I can't wait to share it my play date moms. Most of the things are readily available at home. This craft can be done in a group, yet each child can use his/her imagination to create their very own Fish bowl.

Supplies you need:
 Paper Plate
Craft form or color paper
Paint/paint brush or color pen or Crayon (blue and green)
Scissor
Wiggle eyes (optional)
Craft glue

Make the kids to sit with all the supplies nearby, explain and talk to them about Fish Bowl.

Using the Scissor cut a small section on the top of the paper plate to resemble the shape of a Fish Bowl.

Color the Inner side of the paper plate with blue crayon or  pen (else use blue paint and let it dry). Draw different fish patterns on craft form or craft paper which ever is handy and cut out the fish patterns.Glue the fish onto the blue side of the plate.

Add wiggle eyes or you can draw eyes with black pen.

Cut some color paper and stick them to the paper plate or decorate it to make it look like ocean creature or plants.

Color the small part of paper plate and color it green. Paste this section to the bottom of the Fish Bowl.

Tips:
If you are working with small kids try and cut the paper fish in advance.
You can also use glitter on the fish to add more color.
Place some glue on the bottom of the plate and before it sets,place sand or gravel
You can finger paint some bubbles if you like!


Monday, January 17, 2011

Cereal Tower

Ceral Tower is a fun way to keep little bodies busy specially on a snowy day like today.Its a fun activity for one kid or a small group (preschool or kindergarten), its quick and easy as most things are almost always available at hand.

Things you need:
Play dough or you can make your own dough
Uncooked spaghetti 4-8 sticks
Cereal with holes like Cheerios or Fruit Loops

Keep all the things you need nearby and make the kid(s) sit down at the table. Explain to them the fun activity and ask them to listen carefully(make it interesting).


Take some dough and make a nice round ball. Then press it on to a flat surface or a small flat bowl.


Next attach the same size spaghetti sticks in the middle so it can take the weight of the cereal,  else you can attach 3-4 sticks spread on the dough for more fun.


Fill a bowl with O shaped cereals like Cheerios or Fruit Loops. Tell the kids to thread the Cereal into the spaghetti to make a tall tower. You may show the children how it is done.


Then give them the signal to start. For more fun you can make different color towers and play a game of separation. Who ever finishes the tower first wins, make it more fun with stickers and stamps


Tips:

If the sticks break ask them to make smaller towers
Let the kids experiment and be creative, its a great tool for teaching listening skills, hand-eye coordination and co-operation.